
Press-on nails are supposed to make your manicure easier, not more frustrating. So if your nails keep lifting at the cuticle, popping off at the sides, or feeling loose way sooner than expected, it can feel like something is wrong with the set.
The truth is that press-on lifting usually comes down to a few small application details. Your natural nails may not have been completely clean. The press-on may have been slightly too large. Adhesive may have touched the skin. Water may have weakened the bond before it had time to set.
The good news is that most of these issues are easy to fix. Once you know what causes lifting, you can get a smoother fit, better hold, and longer wear from your EyeCandys handmade press-on nails.
Why Press-On Nails Lift in the First Place
Press-on nails lift when the adhesive bond weakens or when the press-on does not sit flush against your natural nail. Sometimes the issue starts before the nail is even applied. Other times, it happens after application because of water, oil, pressure, or daily habits.
A strong press-on manicure needs three things: a clean nail surface, the right fit, and proper adhesive placement. If one of those is off, lifting becomes more likely.
The most common reasons press-on nails lift include:
- Nails were not clean or dry
- Lotion, sunscreen, or cuticle oil was left on the nail
- The press-on was too large
- Adhesive touched the skin
- Air bubbles were trapped
- Nails got wet too soon after application
- The nail surface was too smooth
- You did not press long enough
- The adhesive did not match your wear goal
If your press-ons are lifting, do not panic. It does not mean press-ons do not work for you. It usually means one part of the routine needs adjusting.
Your Nails Were Not Clean or Dry
Press-on nails need a clean, dry surface to adhere properly. If there is water, dust, old polish, soap residue, or natural oil on your nails, the adhesive may not bond as well.
This is one of the easiest mistakes to make because nails can look clean even when there is residue on the surface. If you washed your hands but did not dry them fully, applied skincare earlier, used sunscreen, or touched your hair products while getting ready, there may be enough residue to affect the hold.
Before applying press-ons, wash your hands and dry them completely. Then wipe each nail with an alcohol pad to remove any leftover oils. Let the nails dry fully before applying sticky tabs or adhesive.
A better prep routine looks like this:
- Remove old polish
- Wash hands with soap and water
- Dry hands completely
- Push back cuticles gently
- Lightly buff the nail surface
- Wipe each nail with alcohol
- Let nails dry before applying
This step may feel small, but it is one of the biggest differences between press-ons that last and press-ons that lift.
Cuticle Oil or Lotion Was Left on the Nail
Cuticle oil and hand cream are great for nail care, but they do not belong on the nail surface right before press-on application.
Oils create slip. Adhesive needs grip. If there is oil, lotion, sunscreen, body butter, or hand cream on your natural nail, the sticky tab or glue may not hold properly. This can cause lifting at the cuticle, sidewalls, or tip.
This does not mean you should skip nail care completely. Hydrated hands and cuticles help your manicure look better. The key is timing.
Use cuticle oil and hand cream regularly between manicures, especially before bed or after removing a set. But when it is time to apply press-ons, your nail surface should be clean, dry, and oil-free.
Think of it this way: moisturize your skin, not the nail plate, right before application.
If you accidentally applied lotion or oil before your press-ons, wash your hands, dry them well, and wipe the nail surface with alcohol before starting over.
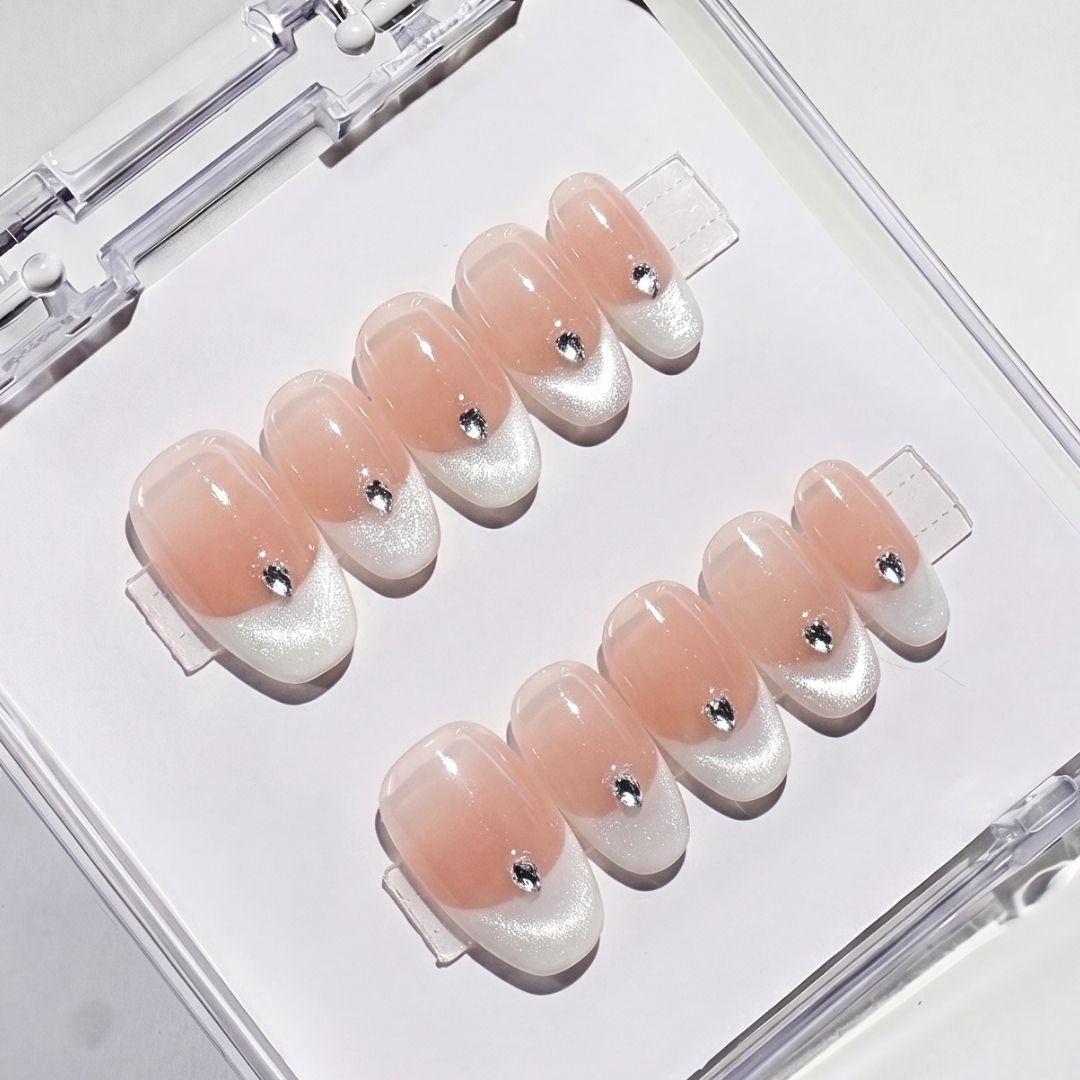
The Press-On Was Too Large
Sizing is one of the biggest reasons press-on nails lift. A press-on nail should cover your natural nail from side to side without overlapping onto the skin.
If the nail is too large, the edges may sit on the skin instead of the nail plate. Since skin moves and naturally produces oils, the adhesive cannot hold as securely there. This often leads to lifting around the sidewalls or near the cuticle.
A press-on that is too large may also feel uncomfortable, bulky, or slightly raised. It may look fine at first, but it is more likely to catch, shift, or pop off.
Before applying, lay out all ten press-ons and match each one carefully to your natural nails. Check the width from sidewall to sidewall. If a nail overlaps the skin, size down or gently file the sides for a better fit.
- Cover the natural nail from edge to edge
- Sit flat against the nail plate
- Avoid touching the surrounding skin
- Follow the natural curve near the cuticle
- Feel comfortable, not tight or pinchy
If you are between sizes, choosing the slightly smaller size is often better than wearing one that is too wide. A smaller nail may leave a tiny edge visible, but an oversized nail is more likely to lift.
The Adhesive Touched Skin
Adhesive should stay on your natural nail, not your skin.
When sticky tabs or glue touch the cuticle or sidewalls, lifting becomes more likely. Skin naturally moves, bends, and produces oil, so adhesive placed on the skin will not hold the same way it does on the nail plate.
This is why placement matters so much. If you are using sticky tabs, place the tab on your natural nail while leaving a tiny gap around the cuticle area. EyeCandys’ Insanely Sticky Tabs guidance recommends leaving about a 1 mm gap from the cuticle so the tab does not touch skin.
That small gap helps the adhesive stay exactly where it should be. Once the press-on is placed, the nail can still sit close to the cuticle for a natural look without the adhesive being pushed into the skin.
To avoid adhesive touching skin:
- Choose the correct tab size
- Place tabs on the natural nail only
- Leave a small gap near the cuticle
- Avoid overlapping the sidewalls
- Use less glue if using glue
- Clean up excess adhesive immediately
A cleaner adhesive placement usually means a cleaner-looking manicure and better wear.
Air Bubbles Were Trapped
Air bubbles can weaken the bond between your natural nail, adhesive, and press-on nail. If the nail is not pressed down evenly, small pockets of air can form underneath. Those little gaps can turn into lifting later.
Air bubbles often happen when the press-on is placed flat all at once instead of angled into position. They can also happen if the sticky tab is wrinkled, too large, or not smoothed down before the nail is applied.
The fix is to place the press-on at an angle. Start near the cuticle, then lower the nail toward the tip and press firmly. EyeCandys recommends applying the nail at a 45-degree angle, pushing the base toward the cuticle, then pressing flat.
This helps the nail sit more flush and reduces trapped air.
After placing each nail, press firmly across the center, sides, base, and tip. Do not just tap it once and move on. Give the adhesive time to bond.
You Got Your Hands Wet Too Soon
Water can interfere with adhesive, especially right after application. If you wash dishes, shower, swim, soak in a bath, or use hot water too soon, your press-ons may lift before the bond has fully set.
This is especially common when someone applies nails right before getting ready. You put them on, then wash your face, style your hair, apply skincare, rinse something off, or take a shower, and suddenly the edges start lifting.
For better wear, apply press-ons after water-heavy tasks are done. Shower first. Wash your hair first. Do skincare and lotion first. Then clean your nails, remove oils, and apply your press-ons.
EyeCandys recommends avoiding water for the first 4 hours when using Insanely Sticky Tabs. This gives the adhesive time to set and helps reduce early lifting.
To protect your press-ons from water-related lifting:
- Apply nails after showering
- Avoid dishes right after application
- Skip long baths or soaking immediately after
- Avoid swimming right away
- Wear gloves for cleaning
- Keep hands dry during the first few hours
After the adhesive sets, you can use your hands normally, but it is still smart to avoid unnecessary soaking if you want your nails to last longer.
You Skipped Buffing
A natural nail that is too smooth can make it harder for adhesive to grip. Light buffing helps create a slightly textured surface so the sticky tab or adhesive has something to hold onto.
The key word is light. You are not trying to thin your nail or file away layers. You are just removing shine.
Skipping this step may lead to lifting, especially if your nails are naturally smooth or if you recently had polish, gel, or nail treatments on them.
A gentle buffing routine should:
- Remove shine from the nail surface
- Avoid thinning the nail
- Use light pressure
- Stop if nails feel sensitive
- Be followed by an alcohol wipe
If your nails are already thin, peeling, or recovering from damage, be extra gentle. You can still prep carefully, but avoid aggressive filing or buffing.
You Did Not Press Long Enough
Press-on nails need pressure to bond. If you place the nail and move on too quickly, the adhesive may not connect evenly across the nail.
After applying each press-on, press firmly and hold. Focus on the center, then the sides, then the base and tip. This helps the adhesive spread evenly and reduces lifting points.
For Insanely Sticky Tabs, EyeCandys recommends pressing firmly for 10 to 15 seconds. It may not sound like much, but it makes a difference.
A good press-and-hold technique:
- Place the nail carefully
- Press down from cuticle to tip
- Apply even pressure
- Press the side edges gently
- Hold for 10 to 15 seconds
- Avoid shifting the nail once placed
If a nail looks crooked, adjust it right away before the adhesive fully sets. Pulling it up later can weaken the bond.
You Used the Wrong Adhesive for Your Wear Goal
Not every adhesive is meant for the same kind of wear.
If you only want nails for one night, regular sticky tabs may be perfect. If you want your press-ons to last through a long weekend, vacation, work trip, or multiple days of plans, you may need a stronger adhesive option.
EyeCandys press-on nail sets include regular sticky tabs designed for around 3 days or single-event wear. For longer wear, EyeCandys’ Insanely Sticky Tabs are designed for up to 10 days of hold with a high-adhesion, waterproof, ultra-thin fit.
A simple adhesive guide:
- For one event: regular sticky tabs
- For a short weekend: regular tabs or stronger tabs
- For longer wear: Insanely Sticky Tabs
- For easier removal: sticky tabs
- For reusable nails: tabs are usually easier than heavy glue
- For the strongest hold: glue may be an option if appropriate for you
If your nails keep lifting because your adhesive is not strong enough for your plans, upgrading your tabs may help. If you only need a short-term manicure, do not overdo it with stronger adhesive unless you really need it.
You Are Using Your Nails as Tools
Even perfectly applied press-ons can lift if they are used to pry, scrape, pick, or open things.
Your nails are not tools. Using them to open cans, peel labels, scrape stickers, pull tabs, or pick at packaging puts pressure on the adhesive and can cause lifting at the tip or sides.
Try using your fingertips, knuckles, or an actual tool instead. This is especially important with longer shapes, detailed designs, or nails you want to reuse.
Be careful when:
- Opening cans
- Pulling zippers
- Peeling stickers
- Opening packages
- Scraping labels
- Styling hair
- Grabbing keys from a tight bag
- Buttoning tight clothing
A little extra care can help your press-ons last much longer.
How to Fix a Press-On Nail That Starts Lifting
If one nail starts lifting, do not pull it off unless it is already loose enough to remove safely. Picking at the edge can make the lifting worse and may damage your natural nail.
If the nail is only slightly lifted, press it back down gently. If it does not stay, remove it carefully, clean the natural nail, and reapply with a fresh sticky tab.
To fix a lifted nail:
- Do not pick or pull at it
- Check whether it is loose enough to remove
- If needed, soak gently to loosen the adhesive
- Clean and dry your natural nail
- Wipe away oil or residue
- Apply a fresh sticky tab
- Reapply the press-on
- Press firmly and hold
If you are going to an event, keep extra sticky tabs in your bag. They are small, easy to carry, and helpful if you need a quick fix.
How to Prevent Lifting Next Time
Preventing lifting is mostly about slowing down during application. You do not need a complicated routine, but you do need a clean surface, the right size, and careful placement.
Before applying press-ons, make sure your hands are clean and dry. Avoid lotion, sunscreen, and cuticle oil right before application. Choose the right size for each nail, and make sure the press-on does not overlap your skin. Lightly buff the nail surface, wipe with alcohol, and let the nail dry completely.
When applying sticky tabs, keep them on the nail plate and away from the skin. Place the press-on at a 45-degree angle, press it flat, and hold firmly. After application, avoid water for the first few hours, especially if you want longer wear.
A better press-on routine looks like this:
Get a Hold That Actually Lasts
EyeCandys handmade press-on nails are built for a clean, secure fit. Prep right, press firm, and enjoy a manicure that stays put.